Data Migration Framework is an Add-on for Microsoft Dynamics AX 2012, it helps import bulk data in AX using standard UI of Dynamics AX. Examples of data which can be imported are, Customers, Vendors, Vendor & Customer addresses, BOM, etc.
The Data Migration Framework is available from the InformationSource services download page. DMF supports ODBC, AX Database and File format. See more details at TechNetpage for detailsrelated to Architecture & File format support.
In this post we will see how to import Customers Master data in AX 2012 using DMF and will see how much simple and useful this Add-on is.
DMF needs to be installed on following computers:
1. Computer running SQL Server Integration Services
2. Computer running AOS
3. Client computer
For more installation details see Install the Data Migration Framework [AX 2012] topic at TechNet. DMF Creates some tables in AOT for staging purpose during installation.
Dont' forget to compile your application and Database Synchronization after installation of DMF, otherwise an error will be generated when youclick on any menu item in DMF section.

Source is the data user want to import, Staging is the intermediary place where system keeps data for verification and user, Target is the AX database where actual AX data is kept, when user processes from staging to target then all data kept at staging will be copied to target (AX) tables.


Now General Settings are finished, screen should look like this
 Next important thing is Application related details, click on Application to do settings, following settings will be don here:
Chart of Accounts Delimiter - Select this to specify in which format Dimensions will be available in file, we will use "-" it means we will enter data in following format Department-CostCenter-ExpensePurpose.
Name Sequence - Select what would be the default sequence for migration of party records i.e. First Name, Last Name or any of the combinations given in the list. We will use "First Middle Last" for our example.
The screen should look like below after above settings

Next step is to identify identities to import into AX 2012, now click on Setup->Target entities. A list of all entities will appear. User can create his own entity as well which will be discussed in another post, here we will go on with standard entities. Below is list of default entities available in system, which were discussed in the beginning of the post:

Click on Entities button to select entities to import, click on New a blank line will appear, fill in following columns:
1. Entity Name - Select an entity name from the list to import, we will use Customer for our example
2. Source Data Format - Select the source file format to import, we will use our previously created file format, select CSV from drop down
3. Sample File Path - Give path of the file containing data.
You can see sample files which are shipped with the DMF at <your installation drive\Program Files\Microsoft Dynamics AX 2012 Data Migration Framework Client Components (Beta)\DemoFiles\Delimited\> folder.We will use "CustomerEntity_ContactInfo" file for our example. Now the screen should look like this:
 See a list of demo files with details of entities shipped with DMF at TechNet.


A success message will appear '6' Customer record(s) inserted in staging as I am importing 6 records in the file. See below screenshot.


An information box will appear indicating Data written to target ('6' records created, '0' records updated) as I was importing 6 records, 6 is representing the number of records user is importing.
https://www.youtube.com/watch?v=vbMrqE7sZAs
The Data Migration Framework is available from the InformationSource services download page. DMF supports ODBC, AX Database and File format. See more details at TechNetpage for details
In this post we will see how to import Customers Master data in AX 2012 using DMF and will see how much simple and useful this Add-on is.
DMF needs to be installed on following computers:
1. Computer running SQL Server Integration Services
2. Computer running AOS
3. Client computer
For more installation details see Install the Data Migration Framework [AX 2012] topic at TechNet. DMF Creates some tables in AOT for staging purpose during installation.
Dont' forget to compile your application and Database Synchronization after installation of DMF, otherwise an error will be generated when you
ARCHITECTURE:
Following diagram shows architecture of DMF.Source is the data user want to import, Staging is the intermediary place where system keeps data for verification and user, Target is the AX database where actual AX data is kept, when user processes from staging to target then all data kept at staging will be copied to target (AX) tables.
CONFIGURATIONS:
Following diagram shows configurations required for successful transfer of data into AX 2012.
FOLLOWING DEFAULT ENTITIES ARE AVAILABLE TO IMPORT IN AX 2012.
- Bill of materials (BOM)
- Contacts
- Contact addresses
- Customer
- Customer addresses
- Dimension
- Employees
- Employee addresses
- Inventory journal
- Ledger balances
- Main account
- Open invoices (accounts payable)
- Open invoices (accounts receivable)
- Open sales orders
- Open
purchase orders - Price disc
- Product
- Project
- Unit of measure
- Vendor
- Vendor address
PROCESS
In this blog we will learn how to import customers & Customer Addresses using DMF. Below is data transfer process of DMF.
Source to Staging:
When data is copied from source to staging a "Processing Group" is required to be associated with entities to run as job. At this stage data is copied from "Source" to "Staging" where user can verify and edit data before finally moving to "Target".
Staging to Target:
After validating data from Staging, user can process Staging to Target to copy data in actual database, system will use same Processing Group created for Source to Staging to process Staging to Target.
Remove Staging Data:
After staging data is copied to target and is verified, it is recommended to remove staging data from system which was kept by the system for user verification.
PROCESSING
Setup shared directory
An important first configuration is to provide Location of Shared Directory. Click Data Migration Framework->Setup->Data migration framework parameters. Provide the path to a shared directory and click Validate to let system verify the path. This directory will be used by DMF to put some files for internal use. User configuring the shared directory path must have Read/Write permission on the directory.

Setup source Data Format
Click on "Data Migration Framework" click on Setup->Source Data Formats->Click Newto create new record to prepare Source Format

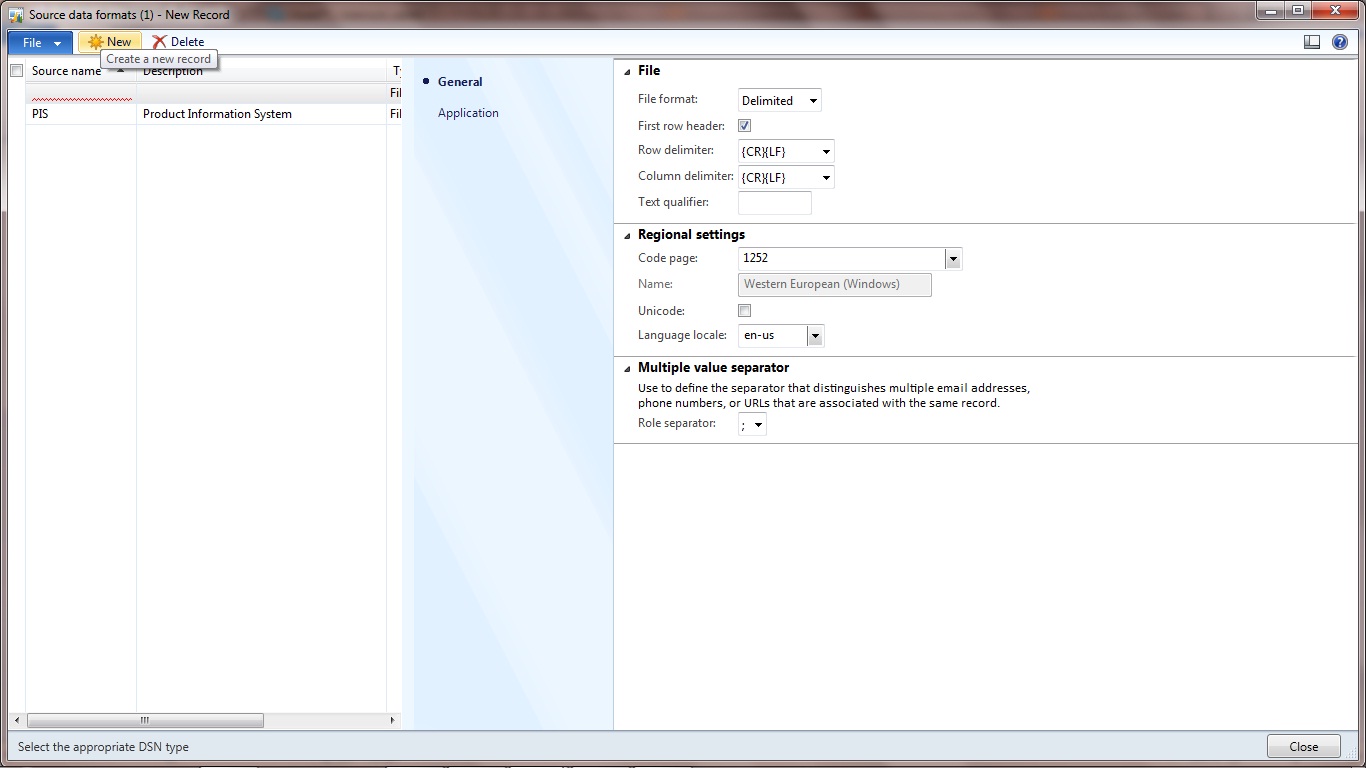
Give Source Name e.g. CSV in Description column write Comma Separated File, inType column select File, then assign the additional details about the data source in right pane of Source Data Format Screen.
Fill following sections on right pane:
Fill following sections on right pane:
File Section
1. File format-provide file format here Delimited or Fixed Width, we will choose Delimited for our example
2. First Row Header check box- check this check box if first row is a header for remaining records
3. Row Delimiter-Select this if your file contains multiple rows. Here user can select "CR,LF,Semicolon {;},Colon {:},etc." we will select {CR}{LF} for our example.
4. Column Delimiter-Select this if your file contains multiple columns to import, this is used to distinguish values between column, there are multiple options available to distinguish we will use Comma for our example.
5. Text Qualifier- Select this if your column type is string and you have to use Delimiter in data e.g. your Delimiter is Comma and you have to use it as data e.g. "2-A Ahmed Block, New Garden Town" here you have to write the comma in double quotes "," so that system don't consider it as Column Delimiter. For our example we will write " as Text Qualifier.

Regional Settings
1. Code Page - Character encoding for the file, there are different options available select your desired one, for our example we will select Western European (Windows)
2. Unicode - Select this if your file is using Unicode, we will not use this option for our example
3. Language Local - Select Language, we will use en-us for our example

Multiple value separator
1. Role Separator - This is used to display multiple values in a column e.g. if a customer have multiple email addresses. We will use semi column for our example.
Now General Settings are finished, screen should look like this

Dimensions
Dimension Code - Select which financial dimensions you want to import, we will chooseDepartment;CostCenter;ExpensePurpose for our example.Chart of Accounts Delimiter - Select this to specify in which format Dimensions will be available in file, we will use "-" it means we will enter data in following format Department-CostCenter-ExpensePurpose.
Name Sequence - Select what would be the default sequence for migration of party records i.e. First Name, Last Name or any of the combinations given in the list. We will use "First Middle Last" for our example.
The screen should look like below after above settings

Next step is to identify identities to import into AX 2012, now click on Setup->Target entities. A list of all entities will appear. User can create his own entity as well which will be discussed in another post, here we will go on with standard entities. Below is list of default entities available in system, which were discussed in the beginning of the post:

Create Processing Group
Next step is to create Processing Group. Processing Group is similar to Definition Groups in AX 2012. Go to Common->Processing Group. Click New give name & description, write "AR" in Name and "Accounts Receivable" in description column. PressSave and Entities button will be enabled.Click on Entities button to select entities to import, click on New a blank line will appear, fill in following columns:
1. Entity Name - Select an entity name from the list to import, we will use Customer for our example
2. Source Data Format - Select the source file format to import, we will use our previously created file format, select CSV from drop down
3. Sample File Path - Give path of the file containing data.
You can see sample files which are shipped with the DMF at <your installation drive\Program Files\Microsoft Dynamics AX 2012 Data Migration Framework Client Components (Beta)\DemoFiles\Delimited\> folder.We will use "CustomerEntity_ContactInfo" file for our example. Now the screen should look like this:

Generate Source Mapping
Click on Generate Source Mapping on entities screen, system will verify the source file columns with staging table columns, if any error is present in the file, system will show the error. There is another section Modify Source Mapping, use this to modify mapping between the fields, user can remove an existing mapping and can create new mapping as well. To remove existing mapping right click on desired link and click Delete Selected Node. To create new link drag the desired field from source to target, it will create a link between the fields.
Preview Source Data
Click on Preview Source file on entities screen, system will display data in preview grid for user checking. See Preview section on above screen shot with data populated in grid. Close the screen and go back to processing group screen to process further.
Get Staging Data
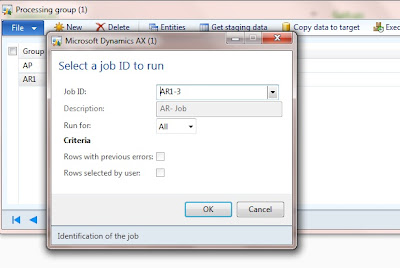
Click on Common->Processing Group, select the previously created group click Get Staging Data, system will ask for JobID to create a Job for running Staging Data routine. Provide an appropriate ID, Description and click "OK". See screen shot below:

System will show another screen with job created in it, in that screen user can click onPreview to verify data again. Click on Run button to run the job to prepare staging data. A screen will appear where user can schedule a re-occurrence batch job to run the job and press OK to run the job instantly. see below screen shot of Staging Data Preparation main screen.

A success message will appear '6' Customer record(s) inserted in staging as I am importing 6 records in the file. See below screenshot.

View Execution History
User can view execution history of staging data processing using Processing Groupscreen. Click on Common->Processing Group select the appropriate processing group and Click Execution History, a screen will appear showing all executed jobs. Select a job from the previously executed jobs to see execution details. A selection of JobID is also available for filtration of jobs as well. See below screen shot.

An important thing on this screen is, user can see Staging Data and even user can edit data before processing to Target. To view or edit the staging data, select the appropriateJobID and click View Staging Data. A screen will appear with all data copied fromSource to Staging. See below screen shot.

On this screen user can edit and validate data before processing for Staging to Target. Do changes if required otherwise close the screen. Now user can copy data from staging to target. User can copy data from staging to target from Execution History or Processing Group screens. Click on Copy Data to target button, system will ask for the job to run, select the your desired JobID and click OK. See below screenshot.

Another screen will appear from where user can run the job. Click on Run to start staging to target data copy process. System will again prompt for making a re-occurrence job, do the re-occurrence settings or click OK to process the job.

An information box will appear indicating Data written to target ('6' records created, '0' records updated) as I was importing 6 records, 6 is representing the number of records user is importing.
For Practically click the below link:
It is amazing to visit your site. Thanks for sharing this information, this is useful to me...
ReplyDeleteMicrosoft Dynamics AX Training
MS Dynamics AX Training
MS Dynamics Training in Hyderabad
Microsoft Dynamics AX Technical Training
Microsoft Dynamics AX Technical Training in Hyderabad
MS Dynamics Technical Online Training
Migrating to the cloud is often seen as a big, scary thing. While it can be a daunting task, it doesn't have to be.Azure's Migrate service can help you make the move to the cloud with a few simple steps.3
ReplyDeleteThanks for sharing such a informative blog related to professional imf registration Form click on it.
ReplyDelete